Choosing the correct HIPAA compliant video conferencing system for your company and your personal use is important--you want a system that offers you the most secured protection plan and is also accessible. HIPAA Video’s video conferencing system offers all of that and more. Secured by end-to-end encryption, a two-step authentication process, and a federally approved cloud-based storage system, HIPAA Video offers you safety and protection when you conduct your appointments and business.
Now that you’ve chosen HIPAA Video, you’re wondering how to get started. This will be your official HIPAA Video guide for your account set-up and how to use the easy video conferencing system.
Let's Get You Started With HIPAA Video
First, let’s distinguish that account setups for clients (providers like doctors and clinics) and new patients are slightly different. What both clients and new patients need to ensure is that you currently have access to high-speed internet. The great thing about HIPAA Video is that its system runs on any Windows, Mac, or smart device without installing or downloading anything. You just need to make sure that you have either Google Chrome (the recommended), Edge/Chromium, Firefox, or Safari. When using a smart device like a mobile or tablet, use Google Chrome for androids and Safari for iOS.
After figuring that out, it’s time to move on to the next steps where things slightly differ between client accounts and patient accounts.
Getting Your HIPAA Video Account Started-- Clients (Doctors and Clinics)
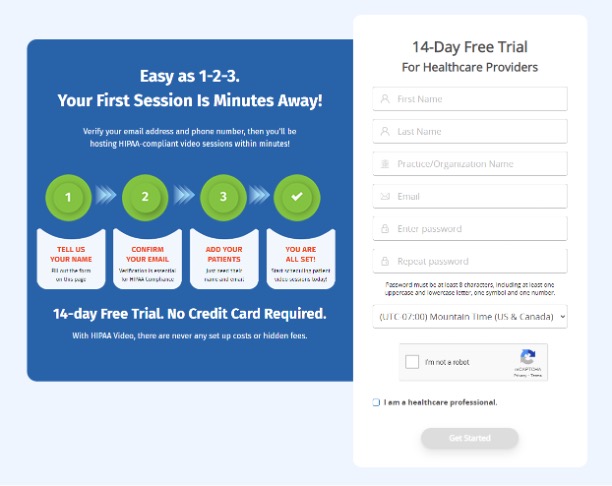
Step 1: Visit https://www.hipaavideo.net/pricing
- Clients, doctors, and clinics--create a new account by clicking the above link, click try free, and complete the sign-up form as prompted.
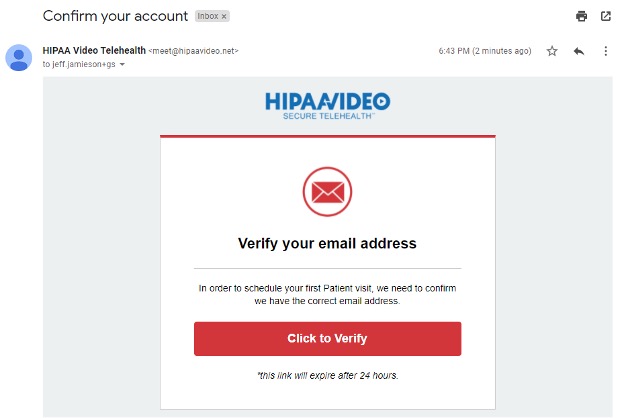
Step 2: Verify your email address!
- Immediately go to the email that you used to complete the sign-up form. Click on the email sent by HIPAA Video and click Verify Email Address. If you can’t find the email, check your Spam/Junk mailbox or wait a couple of minutes just in case the email was delayed. If you still haven’t received an email from HIPAA Video, contact us at 1.866.444.7221.
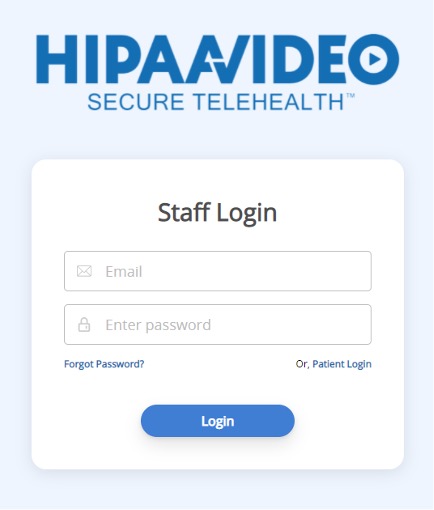
Step 3: Log in to your new account
- Log in to your new account by clicking continue upon verifying your email. Enter your email and password as prompted and click log in.
Step 4: Adding your first patient
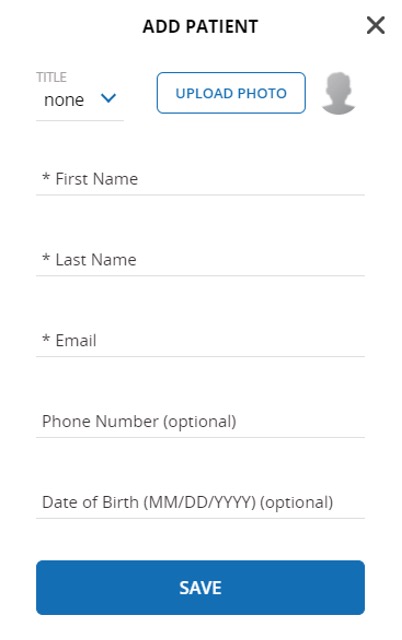
- Since you’re a new user, you will be prompted by ‘help tips’ to add at least one patient before you can schedule an appointment. After, click Add Patient to add your first patient.
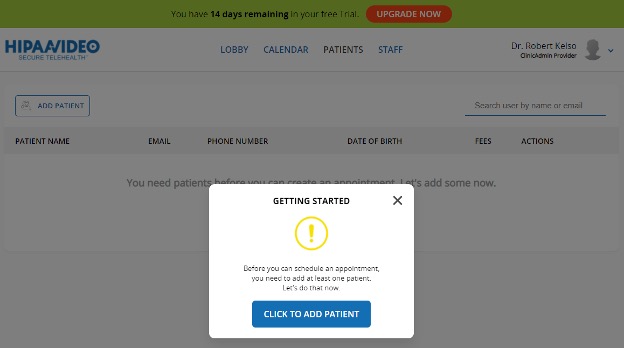
- Enter the required fields to add your patient(s), then click Save.
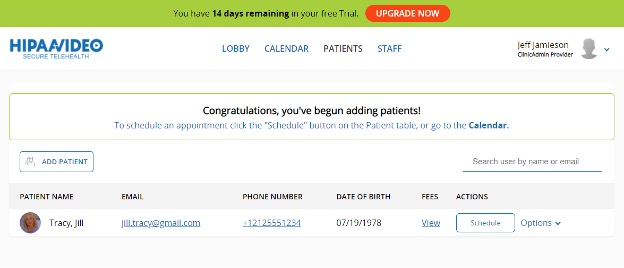
- Now you’re ready to begin scheduling appointments with your patients.
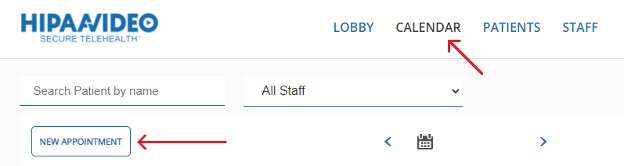
Step 5: Scheduling an appointment
- Click APPOINTMENTS on the upper toolbar, then proceed to click NEW APPOINTMENT.
- Enter the Appointment Details as prompted
- Choose the Date, Time, and Duration
- You can Search and Select your patient by name or email
- You can add up to 5 Participants
- Recurrence is optional to schedule recurring appointments
- Click Schedule
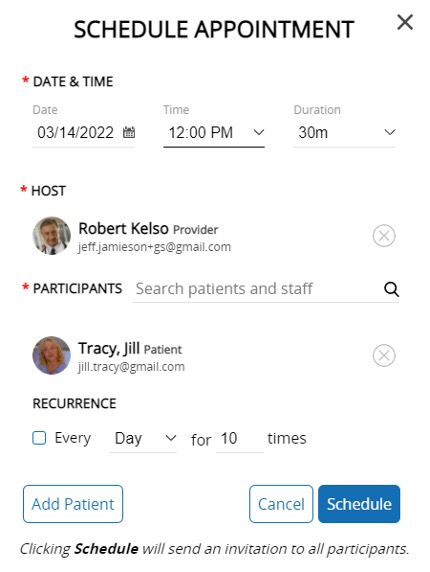
- Your patient will immediately receive an invitation and SMS if their mobile number was added to their profile.
- Before joining the call, your patient will be asked to enter a unique password to securely sign and join the video call.
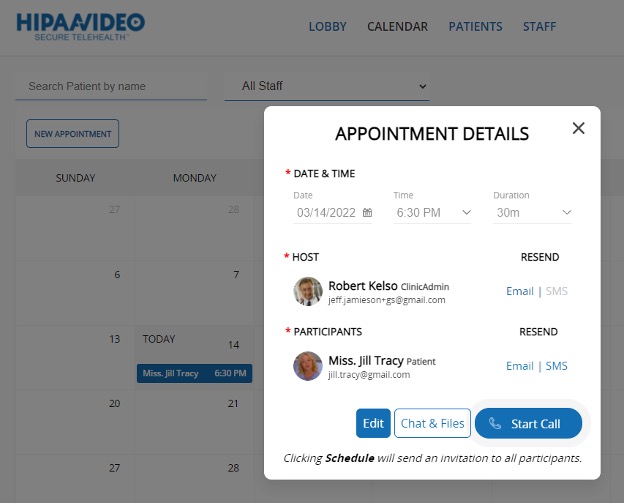
Step 6: Starting an appointment
- Make it on time to scheduled appointments by locating the appointment on your calendar:
- Click on the scheduled appointment marked with the patient's name in blue.
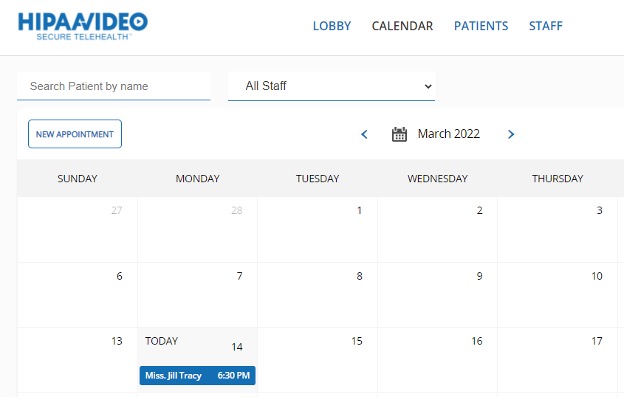
- Then, click Start Call.
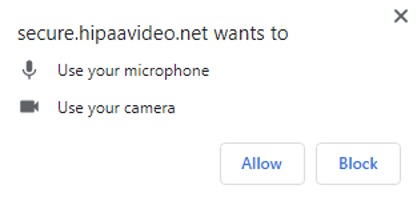
Step 7: Compatibility check and allow microphone and video
- While your visit is loading, a brief compatibility check will run to test your equipment and network connection.
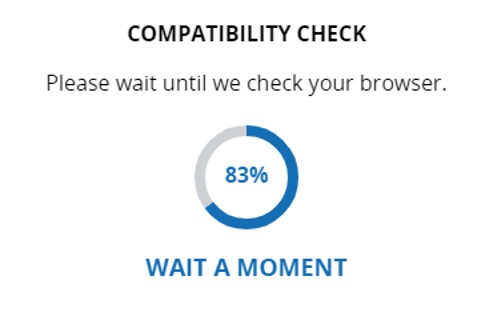
- This brief test runs each time before you join a call to ensure you have the best experience possible!
- When prompted, allow your camera and microphone.
- A camera and microphone are required to join a call.
- If the compatibility check is stuck, simply refresh the page.
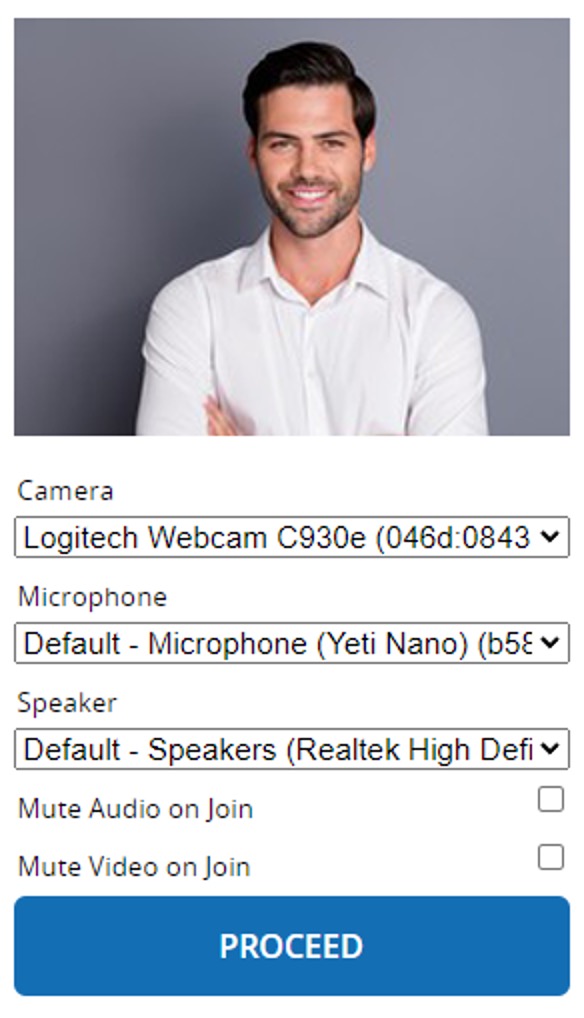
Step 8: Select Media Device(s)
- Before joining a call:
- Choose your Camera, Microphone, and Speaker devices.
- Mute your Audio or Video before joining (optional).
- Click Proceed to join the call.
Step 9: Things to note while your video call is in session.
- As the Host, you will have access to the following features:
- End Call
- Mute Microphone
- Mute Video
- Chat
- In-Session Notes
- Screen Share
- Recording
- Media Device Settings

- To end the call, simply click the red End Call button.
Now your client account is ready to be used and you know how to add patients, schedule appointments, and begin a video call with your patient(s).
Getting Your HIPAA Video Account Started--New Patients
Step 1: Receiving an invitation
- Your doctor will have an invitation sent to your email account and mobile through SMS.
- Open the email and click View Appointment Details.
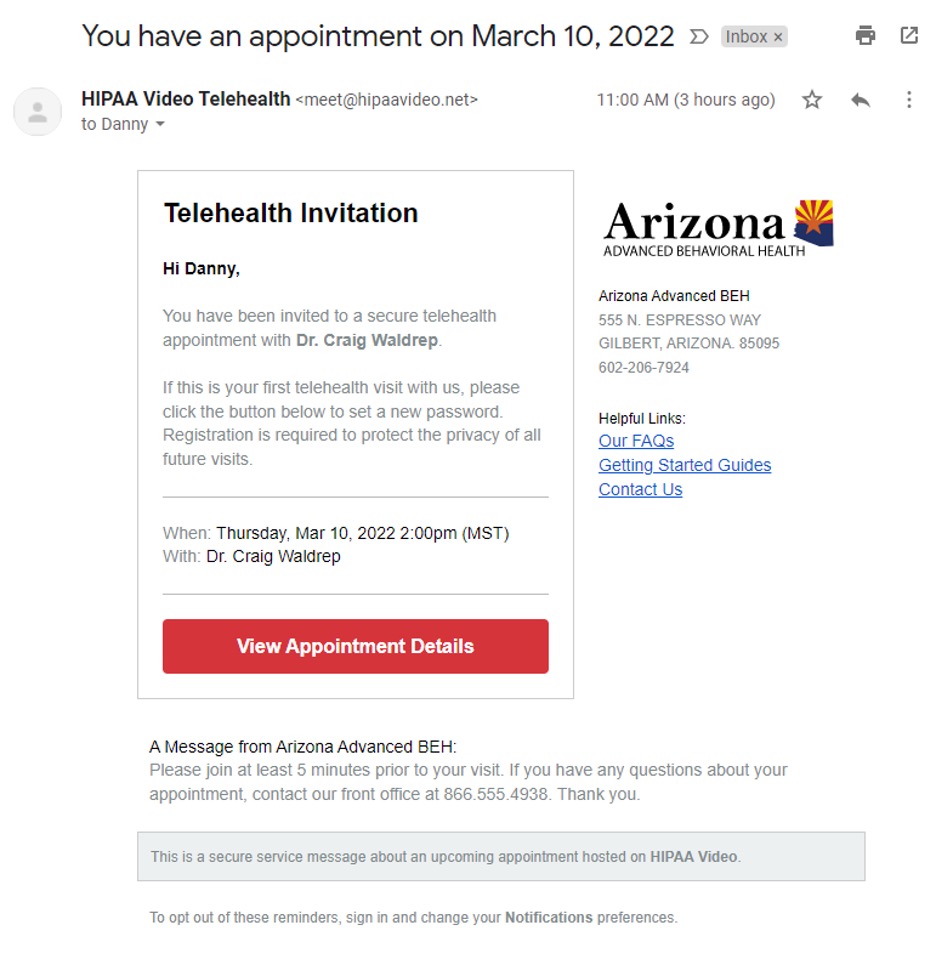
- If you can’t find the email, check your Spam/Junk mail or wait a couple of minutes, the email might be delayed.
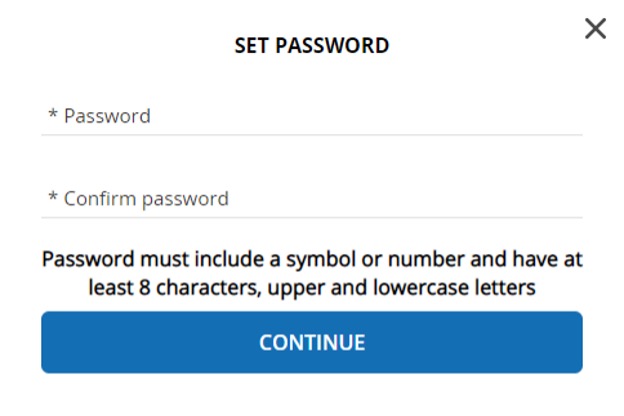
Step 2: Create a password
- To safeguard your safety, privacy, and security of your telehealth visits, HIPAA Video requires password protection.
- Enter and Confirm your new password.
- Click Continue.
Step 3: Go to your appointment.
- Upon signing in, the first page you will see is your Calendar and a list of upcoming appointments:
- Find your appointment, and click the green Start Call button.

Step 4: Compatibility check and allow microphone and video
- While your visit is loading, a brief compatibility check will run to test your equipment and network connection.
- This brief test runs each time before you join a call to ensure you have the best experience possible!
- When prompted, allow your camera and microphone.
- A camera and microphone are required to join a call.
- If the compatibility check is stuck, simply refresh the page.
Step 5: Select Media Device(s)
- Before joining a call:
- Choose your Camera, Microphone, and Speaker devices.
- Mute your Audio or Video before joining (optional).
- Click Proceed to join the call.
Step 6: Things to note while your video call is in session.
- As a patient, you will have access to the following features:
- End Call
- Mute Microphone
- Mute Video
- Chat
- Screen Share
- Media Device Settings
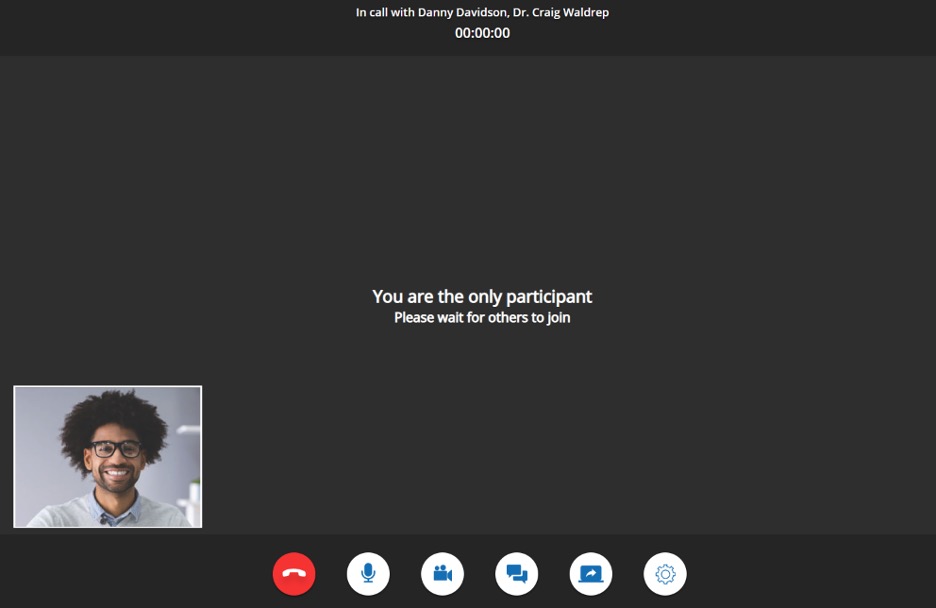
- If your Provider is not in the meeting, you will see a message that reads “You are the only participant”. Please wait for your provider to arrive.
- To end the call, simply click the red End Call button.
Now you are on your way to using HIPAA Video for your telehealth needs!